UI 描述
React 是一个用于渲染用户界面 (UI) 的 JavaScript 库。UI 由按钮、文本和图像等小型单元构建而成。React 允许您将它们组合成可重用、可嵌套的组件。从网站到手机应用,屏幕上的所有内容都可以分解成组件。在本章中,您将学习创建、自定义和有条件地显示 React 组件。
本章内容
你的第一个组件
React 应用由称为组件的 UI 的独立部分构建而成。React 组件是一个 JavaScript 函数,您可以用标记对其进行修饰。组件可以小到一个按钮,也可以大到一个完整的页面。这是一个渲染三个Profile组件的Gallery组件
function Profile() {
  return (
    <img
      src="https://i.imgur.com/MK3eW3As.jpg"
      alt="Katherine Johnson"
    />
  );
}

export default function Gallery() {
  return (
    <section>
      <h1>Amazing scientists</h1>
      <Profile />
      <Profile />
      <Profile />
    </section>
  );
}
import Profile from './Profile.js';

export default function Gallery() {
  return (
    <section>
      <h1>Amazing scientists</h1>
      <Profile />
      <Profile />
      <Profile />
    </section>
  );
}
使用 JSX 编写标记
每个 React 组件都是一个 JavaScript 函数,它可能包含一些 React 渲染到浏览器中的标记。React 组件使用称为 JSX 的语法扩展来表示该标记。JSX 看起来非常像 HTML,但它更严格一些,并且可以显示动态信息。
如果我们将现有的 HTML 标记粘贴到 React 组件中,它并不总是能正常工作。
export default function TodoList() {
  return (
    // This doesn't quite work!
    <h1>Hedy Lamarr's Todos</h1>
    <img
      src="https://i.imgur.com/yXOvdOSs.jpg"
      alt="Hedy Lamarr"
      class="photo"
    >
    <ul>
      <li>Invent new traffic lights
      <li>Rehearse a movie scene
      <li>Improve spectrum technology
    </ul>
如果您有这样的现有 HTML,您可以使用转换器来修复它。
export default function TodoList() {
  return (
    <>
      <h1>Hedy Lamarr's Todos</h1>
      <img
        src="https://i.imgur.com/yXOvdOSs.jpg"
        alt="Hedy Lamarr"
        className="photo"
      />
      <ul>
        <li>Invent new traffic lights</li>
        <li>Rehearse a movie scene</li>
        <li>Improve spectrum technology</li>
      </ul>
    </>
  );
}
在 JSX 中使用大括号编写 JavaScript
JSX 允许你在 JavaScript 文件中编写类似 HTML 的标记,从而将渲染逻辑和内容保存在同一个位置。有时你可能需要添加一些 JavaScript 逻辑或引用标记内的动态属性。在这种情况下,你可以在 JSX 中使用大括号来“打开一个窗口”进入 JavaScript。
const person = {
  name: 'Gregorio Y. Zara',
  theme: {
    backgroundColor: 'black',
    color: 'pink'
  }
};

export default function TodoList() {
  return (
    <div style={person.theme}>
      <h1>{person.name}'s Todos</h1>
      <img
        className="avatar"
        src="https://i.imgur.com/7vQD0fPs.jpg"
        alt="Gregorio Y. Zara"
      />
      <ul>
        <li>Improve the videophone</li>
        <li>Prepare aeronautics lectures</li>
        <li>Work on the alcohol-fuelled engine</li>
      </ul>
    </div>
  );
}
向组件传递 props
React 组件使用 *props* 来彼此通信。每个父组件都可以通过传递 props 来向其子组件传递一些信息。Props 可能让你想起 HTML 属性,但你可以通过它们传递任何 JavaScript 值,包括对象、数组、函数,甚至是 JSX!
import { getImageUrl } from './utils.js'

export default function Profile() {
  return (
    <Card>
      <Avatar
        size={100}
        person={{
          name: 'Katsuko Saruhashi',
          imageId: 'YfeOqp2'
        }}
      />
    </Card>
  );
}

function Avatar({ person, size }) {
  return (
    <img
      className="avatar"
      src={getImageUrl(person)}
      alt={person.name}
      width={size}
      height={size}
    />
  );
}

function Card({ children }) {
  return (
    <div className="card">
      {children}
    </div>
  );
}
条件渲染
你的组件通常需要根据不同的条件显示不同的内容。在 React 中,你可以使用 JavaScript 语法(例如 if 语句、&& 和 ? : 运算符)有条件地渲染 JSX。
在这个例子中,JavaScript && 运算符用于有条件地渲染一个对勾。
function Item({ name, isPacked }) {
  return (
    <li className="item">
      {name} {isPacked && '✅'}
    </li>
  );
}

export default function PackingList() {
  return (
    <section>
      <h1>Sally Ride's Packing List</h1>
      <ul>
        <Item
          isPacked={true}
          name="Space suit"
        />
        <Item
          isPacked={true}
          name="Helmet with a golden leaf"
        />
        <Item
          isPacked={false}
          name="Photo of Tam"
        />
      </ul>
    </section>
  );
}
渲染列表
你经常需要从数据集合中显示多个类似的组件。你可以使用 JavaScript 的 filter() 和 map() 方法与 React 一起过滤和转换你的数据数组,将其转换为组件数组。
对于每个数组项,你需要指定一个 key。通常,你应该使用数据库中的 ID 作为 key。Key 允许 React 即使列表发生变化也能跟踪每个项目在列表中的位置。
import { people } from './data.js';
import { getImageUrl } from './utils.js';

export default function List() {
  const listItems = people.map(person =>
    <li key={person.id}>
      <img
        src={getImageUrl(person)}
        alt={person.name}
      />
      <p>
        <b>{person.name}:</b>
        {' ' + person.profession + ' '}
        known for {person.accomplishment}
      </p>
    </li>
  );
  return (
    <article>
      <h1>Scientists</h1>
      <ul>{listItems}</ul>
    </article>
  );
}
保持组件的纯净
有些 JavaScript 函数是 *纯函数*。纯函数
- 只处理自己的事情。它不会更改在其调用之前存在的任何对象或变量。
- 相同的输入,相同的输出。对于相同的输入,纯函数应该始终返回相同的结果。
通过严格地仅将你的组件编写为纯函数,你可以避免随着代码库的增长而出现一整类令人费解的错误和不可预测的行为。这是一个非纯组件的示例。
let guest = 0;

function Cup() {
  // Bad: changing a preexisting variable!
  guest = guest + 1;
  return <h2>Tea cup for guest #{guest}</h2>;
}

export default function TeaSet() {
  return (
    <>
      <Cup />
      <Cup />
      <Cup />
    </>
  );
}
你可以通过传递 prop 而不是修改预先存在的变量来使这个组件变为纯函数。
function Cup({ guest }) {
  return <h2>Tea cup for guest #{guest}</h2>;
}

export default function TeaSet() {
  return (
    <>
      <Cup guest={1} />
      <Cup guest={2} />
      <Cup guest={3} />
    </>
  );
}
你的 UI 作为一棵树
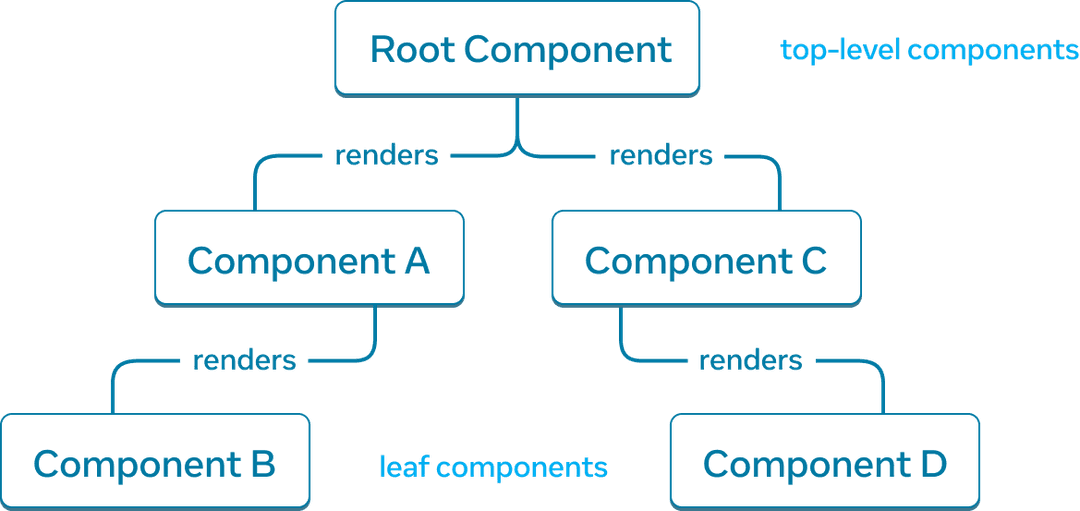
React 使用树来模拟组件和模块之间的关系。
React 渲染树是组件之间父子关系的表示。


一个 React 渲染树示例。
靠近树顶端,靠近根组件的组件被认为是顶级组件。没有子组件的组件是叶子组件。这种组件分类对于理解数据流和渲染性能非常有用。
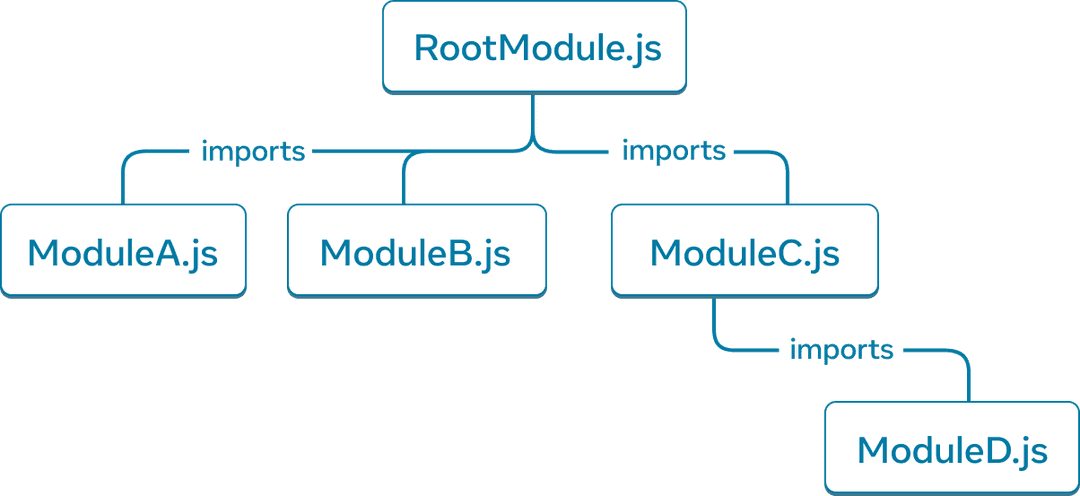
模拟 JavaScript 模块之间的关系是理解你的应用程序的另一种有效方法。我们将其称为模块依赖树。


一个模块依赖树示例。
构建工具通常使用依赖树来捆绑客户端下载和渲染的所有相关 JavaScript 代码。较大的捆绑包大小会降低 React 应用程序的用户体验。理解模块依赖树有助于调试此类问题。
接下来是什么?
前往 你的第一个组件 开始逐页阅读本章!
或者,如果你已经熟悉这些主题,为什么不阅读有关 添加交互性 的内容呢?