React可以改变你对所看到的界面设计和所构建的应用程序的思考方式。使用React构建用户界面时,你首先会将其分解成称为组件的片段。然后,你将描述每个组件的不同视觉状态。最后,你将组件连接在一起,以便数据流经它们。在本教程中,我们将指导你完成使用React构建可搜索的产品数据表的思考过程。
从模型开始
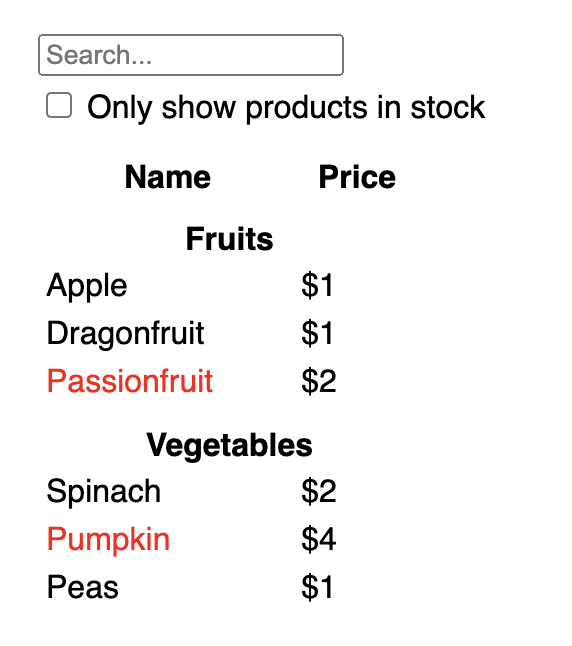
假设你已经拥有一个JSON API和设计师提供的模型。
JSON API返回一些类似这样的数据
[
  { category: "Fruits", price: "$1", stocked: true, name: "Apple" },
  { category: "Fruits", price: "$1", stocked: true, name: "Dragonfruit" },
  { category: "Fruits", price: "$2", stocked: false, name: "Passionfruit" },
  { category: "Vegetables", price: "$2", stocked: true, name: "Spinach" },
  { category: "Vegetables", price: "$4", stocked: false, name: "Pumpkin" },
  { category: "Vegetables", price: "$1", stocked: true, name: "Peas" }
]
模型看起来像这样

要在React中实现UI,你通常会遵循相同的五个步骤。
步骤1:将UI分解成组件层次结构
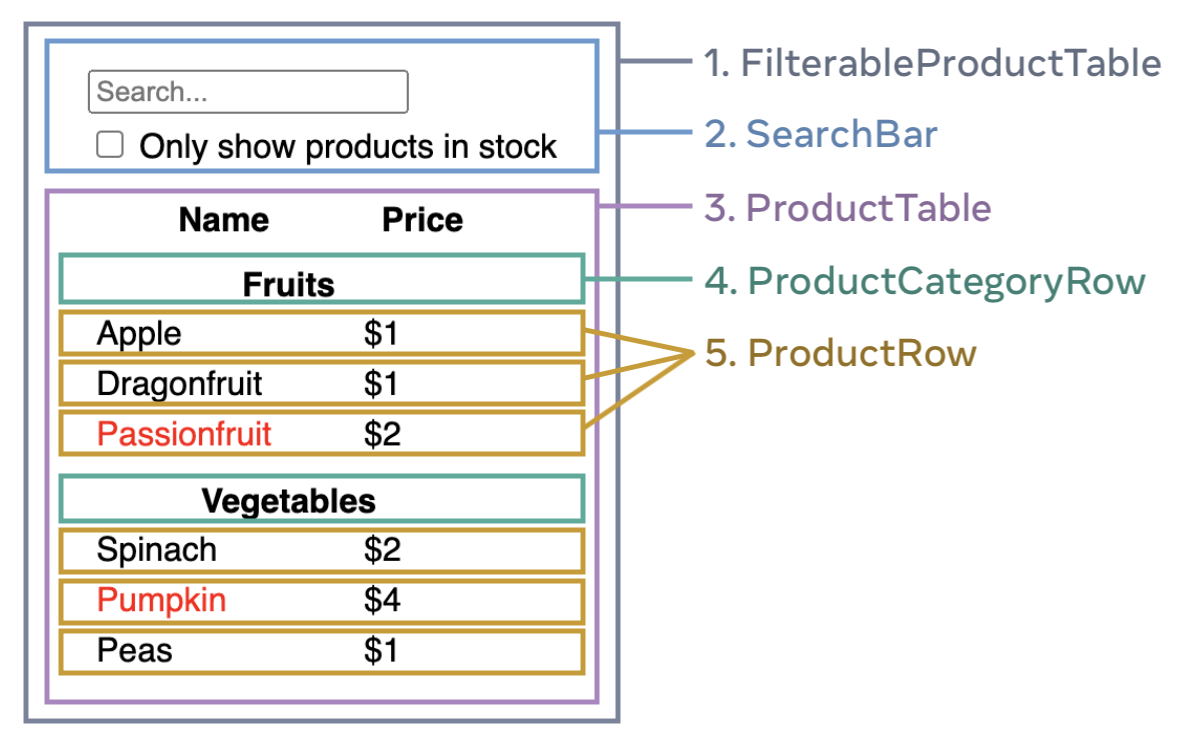
首先在模型中围绕每个组件和子组件绘制方框并为其命名。如果你与设计师合作,他们可能已经在他们的设计工具中命名了这些组件。问问他们!
根据你的背景,你可以考虑以不同的方式将设计拆分成组件
- 编程——使用相同的技术来决定是否应该创建一个新的函数或对象。一种这样的技术是单一责任原则,即一个组件理想情况下只做一件事情。如果它最终变得越来越大,就应该将其分解成更小的子组件。
- CSS——考虑你会为其创建什么类选择器。(但是,组件的粒度要小一些。)
- 设计——考虑你将如何组织设计的图层。
如果你的JSON结构良好,你通常会发现它自然地映射到UI的组件结构。这是因为UI和数据模型通常具有相同的信息架构——即相同的形状。将你的UI分成组件,其中每个组件都与你的数据模型的一部分匹配。
此屏幕上有五个组件

FilterableProductTable(灰色)包含整个应用程序。SearchBar(蓝色)接收用户输入。ProductTable(淡紫色)根据用户输入显示和筛选列表。ProductCategoryRow(绿色)显示每个类别的标题。ProductRow(黄色)显示每个产品的行。
如果你查看ProductTable(淡紫色),你会看到表头(包含“名称”和“价格”标签)不是它自己的组件。这是个偏好问题,你可以选择任何一种方式。在这个例子中,它是ProductTable的一部分,因为它出现在ProductTable的列表内。但是,如果此标题变得复杂(例如,如果你添加排序),你可以将其移到它自己的ProductTableHeader组件中。
现在你已经确定了模型中的组件,请将其排列成一个层次结构。在模型中出现在另一个组件内的组件应在层次结构中显示为子组件
FilterableProductTableSearchBarProductTableProductCategoryRowProductRow
步骤2:在React中构建静态版本
现在你有了组件层次结构,是时候实现你的应用程序了。最直接的方法是从你的数据模型渲染UI,而无需添加任何交互性……至少现在还不行!通常更容易先构建静态版本,然后再添加交互性。构建静态版本需要大量输入,而无需思考,但是添加交互性需要大量思考,而无需大量输入。
为了构建渲染你的数据模型的应用程序的静态版本,你需要构建组件,这些组件重用其他组件并使用props传递数据。Props是将数据从父组件传递到子组件的一种方式。(如果你熟悉状态的概念,请根本不要使用状态来构建此静态版本。状态仅保留用于交互性,即随时间变化的数据。由于这是应用程序的静态版本,因此你不需要它。)
你可以从构建层次结构中较高级别的组件(如FilterableProductTable)开始“自上而下”地构建,或者从较低级别的组件(如ProductRow)开始“自下而上”地构建。在更简单的示例中,通常更容易自上而下,而在更大的项目中,更容易自下而上。
function ProductCategoryRow({ category }) {
  return (
    <tr>
      <th colSpan="2">
        {category}
      </th>
    </tr>
  );
}

function ProductRow({ product }) {
  const name = product.stocked ? product.name :
    <span style={{ color: 'red' }}>
      {product.name}
    </span>;

  return (
    <tr>
      <td>{name}</td>
      <td>{product.price}</td>
    </tr>
  );
}

function ProductTable({ products }) {
  const rows = [];
  let lastCategory = null;

  products.forEach((product) => {
    if (product.category !== lastCategory) {
      rows.push(
        <ProductCategoryRow
          category={product.category}
          key={product.category} />
      );
    }
    rows.push(
      <ProductRow
        product={product}
        key={product.name} />
    );
    lastCategory = product.category;
  });

  return (
    <table>
      <thead>
        <tr>
          <th>Name</th>
          <th>Price</th>
        </tr>
      </thead>
      <tbody>{rows}</tbody>
    </table>
  );
}

function SearchBar() {
  return (
    <form>
      <input type="text" placeholder="Search..." />
      <label>
        <input type="checkbox" />
        {' '}
        Only show products in stock
      </label>
    </form>
  );
}

function FilterableProductTable({ products }) {
  return (
    <div>
      <SearchBar />
      <ProductTable products={products} />
    </div>
  );
}

const PRODUCTS = [
  {category: "Fruits", price: "$1", stocked: true, name: "Apple"},
  {category: "Fruits", price: "$1", stocked: true, name: "Dragonfruit"},
  {category: "Fruits", price: "$2", stocked: false, name: "Passionfruit"},
  {category: "Vegetables", price: "$2", stocked: true, name: "Spinach"},
  {category: "Vegetables", price: "$4", stocked: false, name: "Pumpkin"},
  {category: "Vegetables", price: "$1", stocked: true, name: "Peas"}
];

export default function App() {
  return <FilterableProductTable products={PRODUCTS} />;
}
(如果这段代码看起来很吓人,请先阅读快速入门!)
构建组件后,您将拥有一个可重用组件库来呈现您的数据模型。因为这是一个静态应用程序,所以组件只会返回JSX。层次结构顶部的组件(FilterableProductTable)将把您的数据模型作为prop接收。这被称为单向数据流,因为数据从顶级组件向下流向树底部的组件。
步骤3:查找 UI 状态的最小但完整的表示
为了使UI具有交互性,您需要允许用户更改底层数据模型。为此,您将使用状态。
将状态视为应用程序需要记住的最小变化数据集合。构建状态的最重要原则是保持其DRY(不要重复自己)。找出应用程序所需的绝对最小状态表示,并按需计算所有其他内容。例如,如果您正在构建购物清单,您可以将商品作为数组存储在状态中。如果您还想显示列表中的商品数量,请不要将商品数量存储为另一个状态值——而是读取数组的长度。
现在考虑一下此示例应用程序中的所有数据部分
- 原始产品列表
- 用户输入的搜索文本
- 复选框的值
- 过滤后的产品列表
哪些是状态?找出哪些不是状态。
- 它是否随时间保持不变?如果是,则它不是状态。
- 它是否通过 props 从父组件传递?如果是,则它不是状态。
- 您可以根据组件中现有的状态或 props 计算它吗?如果是,则它绝对不是状态!
剩下的可能就是状态了。
让我们再次逐一检查它们
- 原始产品列表作为 props 传递,因此它不是状态。
- 搜索文本似乎是状态,因为它会随时间变化,并且无法从任何地方计算出来。
- 复选框的值似乎是状态,因为它会随时间变化,并且无法从任何地方计算出来。
- 过滤后的产品列表不是状态,因为它可以通过获取原始产品列表并根据搜索文本和复选框的值对其进行过滤来计算。
这意味着只有搜索文本和复选框的值是状态!做得好!
深入探讨
React中有两种类型的“模型”数据:props和state。两者非常不同
- Props就像您传递给函数的参数。它们允许父组件将数据传递给子组件并自定义其外观。例如,一个
Form可以将colorprop传递给Button。 - State就像组件的内存。它允许组件跟踪某些信息并根据交互对其进行更改。例如,一个
Button可以跟踪isHovered状态。
Props 和 state 不同,但它们一起工作。父组件通常会将某些信息保存在 state 中(以便可以更改它),并将其向下传递给子组件作为它们的 props。如果第一次阅读时差异仍然感觉模糊,这是可以理解的。需要一些练习才能真正掌握!
步骤4:确定状态应该存在的位置
确定应用程序的最小状态数据后,您需要确定哪个组件负责更改此状态,或拥有该状态。记住:React 使用单向数据流,将数据从父组件向下传递到组件层次结构中的子组件。可能无法立即清楚哪个组件应该拥有什么状态。如果您不熟悉此概念,这可能会很有挑战性,但您可以按照以下步骤来解决!
对于应用程序中的每个状态部分
- 确定基于该状态呈现内容的每个组件。
- 找到它们最近的共同父组件——层次结构中高于它们所有组件的组件。
- 决定状态应该存在的位置
- 通常,您可以直接将状态放入它们的共同父组件中。
- 您也可以将状态放入其共同父组件之上的某个组件中。
- 如果您找不到可以拥有状态的组件,请创建一个仅用于保存状态的新组件,并将其添加到共同父组件之上的层次结构中的某个位置。
在之前的步骤中,您在这个应用程序中找到了两个状态部分:搜索输入文本和复选框的值。在这个例子中,它们总是同时出现,所以将它们放在同一个位置是有意义的。
现在让我们按照我们的策略来处理它们
- 确定使用状态的组件
ProductTable需要根据该状态(搜索文本和复选框值)过滤产品列表。SearchBar需要显示该状态(搜索文本和复选框值)。
- 找到它们的共同父组件:这两个组件共享的第一个父组件是
FilterableProductTable。 - 决定状态存在的位置:我们将把过滤器文本和已选中状态值保存在
FilterableProductTable中。
因此,状态值将存在于FilterableProductTable中。
使用useState() Hook向组件添加状态。Hook 是允许您“连接到”React 的特殊函数。在FilterableProductTable的顶部添加两个状态变量,并指定它们的初始状态
function FilterableProductTable({ products }) {
  const [filterText, setFilterText] = useState('');
const [inStockOnly, setInStockOnly] = useState(false);然后,将filterText和inStockOnly作为 props 传递给ProductTable和SearchBar
<div>
  <SearchBar
    filterText={filterText}
    inStockOnly={inStockOnly} />
  <ProductTable
    products={products}
    filterText={filterText}
    inStockOnly={inStockOnly} />
</div>您可以开始了解应用程序的行为方式。将下面的沙箱代码中的filterText初始值从useState('')更改为useState('fruit')。您将看到搜索输入文本和表格都会更新
import { useState } from 'react';

function FilterableProductTable({ products }) {
  const [filterText, setFilterText] = useState('');
  const [inStockOnly, setInStockOnly] = useState(false);

  return (
    <div>
      <SearchBar
        filterText={filterText}
        inStockOnly={inStockOnly} />
      <ProductTable
        products={products}
        filterText={filterText}
        inStockOnly={inStockOnly} />
    </div>
  );
}

function ProductCategoryRow({ category }) {
  return (
    <tr>
      <th colSpan="2">
        {category}
      </th>
    </tr>
  );
}

function ProductRow({ product }) {
  const name = product.stocked ? product.name :
    <span style={{ color: 'red' }}>
      {product.name}
    </span>;

  return (
    <tr>
      <td>{name}</td>
      <td>{product.price}</td>
    </tr>
  );
}

function ProductTable({ products, filterText, inStockOnly }) {
  const rows = [];
  let lastCategory = null;

  products.forEach((product) => {
    if (
      product.name.toLowerCase().indexOf(
        filterText.toLowerCase()
      ) === -1
    ) {
      return;
    }
    if (inStockOnly && !product.stocked) {
      return;
    }
    if (product.category !== lastCategory) {
      rows.push(
        <ProductCategoryRow
          category={product.category}
          key={product.category} />
      );
    }
    rows.push(
      <ProductRow
        product={product}
        key={product.name} />
    );
    lastCategory = product.category;
  });

  return (
    <table>
      <thead>
        <tr>
          <th>Name</th>
          <th>Price</th>
        </tr>
      </thead>
      <tbody>{rows}</tbody>
    </table>
  );
}

function SearchBar({ filterText, inStockOnly }) {
  return (
    <form>
      <input
        type="text"
        value={filterText}
        placeholder="Search..."/>
      <label>
        <input
          type="checkbox"
          checked={inStockOnly} />
        {' '}
        Only show products in stock
      </label>
    </form>
  );
}

const PRODUCTS = [
  {category: "Fruits", price: "$1", stocked: true, name: "Apple"},
  {category: "Fruits", price: "$1", stocked: true, name: "Dragonfruit"},
  {category: "Fruits", price: "$2", stocked: false, name: "Passionfruit"},
  {category: "Vegetables", price: "$2", stocked: true, name: "Spinach"},
  {category: "Vegetables", price: "$4", stocked: false, name: "Pumpkin"},
  {category: "Vegetables", price: "$1", stocked: true, name: "Peas"}
];

export default function App() {
  return <FilterableProductTable products={PRODUCTS} />;
}
请注意,编辑表单尚无效。上面沙箱中有一个控制台错误解释了原因
在上方的沙箱中,ProductTable 和 SearchBar 读取 filterText 和 inStockOnly 属性来渲染表格、输入框和复选框。例如,以下是 SearchBar 如何填充输入值:
function SearchBar({ filterText, inStockOnly }) {
  return (
    <form>
      <input
        type="text"
        value={filterText}
        placeholder="Search..."/>
但是,您还没有添加任何代码来响应用户的操作(例如打字)。这将是您的最后一步。
步骤 5:添加逆向数据流
目前,您的应用使用从上往下的属性和状态传递正确渲染。但是,为了根据用户输入更改状态,您需要支持反向数据流:层次结构中深层的表单组件需要更新 FilterableProductTable 中的状态。
React 使这种数据流明确化,但是它比双向数据绑定需要多输入一些代码。如果您尝试在上面的示例中键入或选中复选框,您会发现 React 会忽略您的输入。这是故意的。通过编写 <input value={filterText} />,您已将 input 的 value 属性始终设置为等于从 FilterableProductTable 传递的 filterText 状态。由于 filterText 状态从未设置,因此输入值从未改变。
您希望实现这样的功能:每当用户更改表单输入时,状态都会更新以反映这些更改。状态由 FilterableProductTable 拥有,因此只有它才能调用 setFilterText 和 setInStockOnly。为了让 SearchBar 更新 FilterableProductTable 的状态,您需要将这些函数传递给 SearchBar。
function FilterableProductTable({ products }) {
  const [filterText, setFilterText] = useState('');
  const [inStockOnly, setInStockOnly] = useState(false);

  return (
    <div>
      <SearchBar
        filterText={filterText}
        inStockOnly={inStockOnly}
        onFilterTextChange={setFilterText}
        onInStockOnlyChange={setInStockOnly} />
在 SearchBar 内部,您将添加 onChange 事件处理程序并通过它们设置父级状态。
function SearchBar({
  filterText,
  inStockOnly,
  onFilterTextChange,
  onInStockOnlyChange
}) {
  return (
    <form>
      <input
        type="text"
        value={filterText}
        placeholder="Search..."
        onChange={(e) => onFilterTextChange(e.target.value)}
      />
      <label>
        <input
          type="checkbox"
          checked={inStockOnly}
          onChange={(e) => onInStockOnlyChange(e.target.checked)}
现在应用程序完全可以运行了!
import { useState } from 'react';

function FilterableProductTable({ products }) {
  const [filterText, setFilterText] = useState('');
  const [inStockOnly, setInStockOnly] = useState(false);

  return (
    <div>
      <SearchBar
        filterText={filterText}
        inStockOnly={inStockOnly}
        onFilterTextChange={setFilterText}
        onInStockOnlyChange={setInStockOnly} />
      <ProductTable
        products={products}
        filterText={filterText}
        inStockOnly={inStockOnly} />
    </div>
  );
}

function ProductCategoryRow({ category }) {
  return (
    <tr>
      <th colSpan="2">
        {category}
      </th>
    </tr>
  );
}

function ProductRow({ product }) {
  const name = product.stocked ? product.name :
    <span style={{ color: 'red' }}>
      {product.name}
    </span>;

  return (
    <tr>
      <td>{name}</td>
      <td>{product.price}</td>
    </tr>
  );
}

function ProductTable({ products, filterText, inStockOnly }) {
  const rows = [];
  let lastCategory = null;

  products.forEach((product) => {
    if (
      product.name.toLowerCase().indexOf(
        filterText.toLowerCase()
      ) === -1
    ) {
      return;
    }
    if (inStockOnly && !product.stocked) {
      return;
    }
    if (product.category !== lastCategory) {
      rows.push(
        <ProductCategoryRow
          category={product.category}
          key={product.category} />
      );
    }
    rows.push(
      <ProductRow
        product={product}
        key={product.name} />
    );
    lastCategory = product.category;
  });

  return (
    <table>
      <thead>
        <tr>
          <th>Name</th>
          <th>Price</th>
        </tr>
      </thead>
      <tbody>{rows}</tbody>
    </table>
  );
}

function SearchBar({
  filterText,
  inStockOnly,
  onFilterTextChange,
  onInStockOnlyChange
}) {
  return (
    <form>
      <input
        type="text"
        value={filterText} placeholder="Search..."
        onChange={(e) => onFilterTextChange(e.target.value)} />
      <label>
        <input
          type="checkbox"
          checked={inStockOnly}
          onChange={(e) => onInStockOnlyChange(e.target.checked)} />
        {' '}
        Only show products in stock
      </label>
    </form>
  );
}

const PRODUCTS = [
  {category: "Fruits", price: "$1", stocked: true, name: "Apple"},
  {category: "Fruits", price: "$1", stocked: true, name: "Dragonfruit"},
  {category: "Fruits", price: "$2", stocked: false, name: "Passionfruit"},
  {category: "Vegetables", price: "$2", stocked: true, name: "Spinach"},
  {category: "Vegetables", price: "$4", stocked: false, name: "Pumpkin"},
  {category: "Vegetables", price: "$1", stocked: true, name: "Peas"}
];

export default function App() {
  return <FilterableProductTable products={PRODUCTS} />;
}
您可以在 添加交互性 部分了解有关处理事件和更新状态的所有信息。
下一步
这是一个关于如何思考使用 React 构建组件和应用程序的非常简短的介绍。您可以 立即开始一个 React 项目 或 深入了解本教程中使用的所有语法。